Copying a NuGet repository, all packages and all versions, using PowerShell

Today I needed to copy a full repo to my machine, and then I found some good ready-to-use commands in PowerShell. I created this based on the solution in this post, but it didn’t suffice for me as I would like to have all versions downloaded and not only the lastest.

It is simple, just we have to do it:

# Set the nuget source as trusted first, then it won't show any pop-ups
Set-PackageSource -Name NuGet-Source -Trusted

# Downloading...
Find-Package -AllVersions -Source NuGet-Source| ForEach-Object {
        Install-Package -Name $_.Name -MaximumVersion $_.Version -Destination 'C:\Temp\Nuget\' -Source NuGet-Source -SkipDependencies
}


Sometimes for some reason, the code above doesn’t return all packages from the remote repository. Then I found a way to do it from Package Manager Console within Visual Studio.
First I create a list of all packages this way (this code must be executed from Visual Studio, in Package Manager Console):

Get-Package -ListAvailable -AllVersions -IncludePrerelease -PageSize 122831 | ForEach-Object { $id = $_.Id; $_.Versions | ForEach-Object { ($id + ',' + $_.Version) } } > C:\Temp\Nuget\AllPackages.txt

Then I use PowerShell (out of Visual Studio):

Get-Content C:\Temp\Nuget\AllPackages.txt | ForEach-Object {
$package = $_.Split(',')
$id = $package[0]
$version = $package[1]

$path = ('C:\Temp\Nuget\' + $id + '.' + $version)

Write-Host $path
if(! (Test-Path -Path $path)) {
Install-Package -Name $id -MaximumVersion $version -Destination 'C:\Temp\Nuget\' -Source NuGetSource -SkipDependencies -AllowPrereleaseVersions
}
}

Effective TFVC branching strategies for DevOps

This post is based on the original article found in ALM Rangers GitHub.

This video is a hands-on based on the article Effective TFVC branching strategies for DevOps (link above), and it shows a good model for being used in TFVC when you want to implement CI/CD scenarios.

Articles about DevOps and Visual Studio Team Services

TFVC to GIT to TFVC – is it possible?

YES! It is possible.

Well, there it is not very straight forward but after you get the correct tools, then it becomes very easy.

TFVC to GIT

In my tests I first converted a project from TFVC to GIT, it was done using the tool git-tfs. The easiest way to install it, it is using Chocolatey, with the command: choco install gittfs

After done the installation you can simply convert any TFVC in GIT, you can read more details in the previous link or simply run the command to fetch all the history for all branches:

git tfs clone https://tfs.codeplex.com:443/tfs/Collection $/project/trunk . --branches=all

commandtfvctogit

After that you must push the changes to a GIT repository:

git remote add origin https://github.com/user/project.git

For TFS your repository is found with this URL standard: http://yourserver:8080/tfs/Collection/ProjectName/_git/GitRepository (or https, changing the port to 443)

Now you can push the content:

git push --all origin


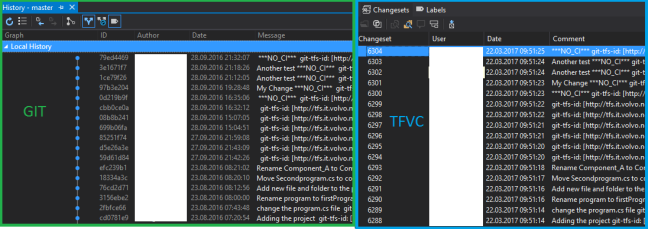
Then in the history, you can see this result comparing TFVC and GIT repositories:
comparetfvcgit

As you can see above all history was kept, even the dates and who did the change. Until here we have a great tool to move our TFVC project to GIT without losing any history.

GIT to TFVC

For this move I am using another tool, git-tf,  also it is very simple. Simple execute the code below to configure the git-tf tool:

git tf configure http://yourserver:8080/tfs/Collection “$\TeamProjectName” –force

I’m using the flag “force” to ensure that the configuration is being applied. Then you must check-in your project to the new team project:

git tf checkin –deep –autosquash –keep-author

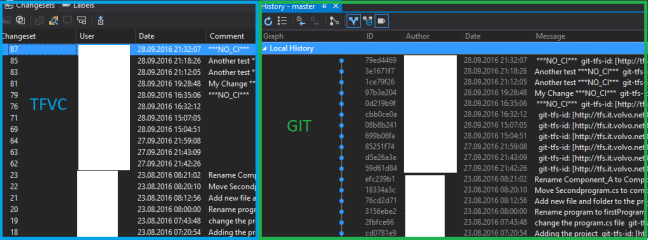
Look how the history looks for GIT and TFVC now:

comparegittfvc

The new TFVC is created with the history, but the dates are not kept unfortunately the tool has such limitation.


Anyway, this approach can help some people to simply move from one to another.

DevOps – High-level overview

DevOps is a cultural change, is about reducing costs and solve complex deliveries in a shorter time.
It is about having a better process to solve issues, instead of keeping the responsibility on some specific people that were responsible for the implementation. Usually, the companies do not have some quick way to solve issues, or to deploy the solution quickly to the production. Sometimes the solution is quickly done in the code bug take ages to reach the production.

DevOps also will help to keep the process lean, removing waste, sometimes the projects are overloaded with extra stuff that simply will slow down the progress. It is not easy to filter out the waste, but it is crucial and the goal for DevOps.

It is all about adding more value to the customer. That’s the focus, the other side effects are related to it, so it will push your project to eliminate waste and reduce the cycle time.

References:
https://en.wikipedia.org/wiki/DevOps
https://app.pluralsight.com/library/courses/devops-big-picture/table-of-contents

Easy way to upload TFS 2015 build tasks (using TFX)

First of all, we are talking about TFS 2015 build tasks, TFX tool and powershell tasks.

What do you need?

  • TFX installed
  • json file
  • ps1 file
  • full TFS access


How to authenticate with TFX:

I’m using basic authentication,

tfx login –auth-type basic

It will ask for:

Service-URL: http://tfs.yourdomain.com:8080/tfs

Username: domain\ID

Password: password


Once authenticated, go to the folder where your files are and execute this command to push all to the server:
tfx build tasks upload –task-path .\


The json file

Use another task as base for your new task, you must set a new GUID for your new task, it will identify your task. You must increase the version before each upload. And you can define the GUI in this file.

TFS API to manipulate your server Workspaces

Hi all, one in a while we need to do some changes within our TFS Build process template, and a easy way to do it is using powershell in pre or post build command.

I will add a sample code to find the current workspace and then you can program what you need from this point on.

Code:

# load the needed client dll’s
[void][System.Reflection.Assembly]::LoadWithPartialName(“Microsoft.TeamFoundation.VersionControl.Client”)

#here I’m considering that your workspace is one folder up

$rootBuildPath = (get-item $PSScriptRoot ).parent.FullName

#here I get the workspaces set for that local folder

$workspaceInfos = [Microsoft.TeamFoundation.VersionControl.Client.Workstation]::Current.GetLocalWorkspaceInfoRecursively($rootBuildPath)

#here I can get the tfs collection

$tfsCollection = [Microsoft.TeamFoundation.Client.TfsTeamProjectCollectionFactory]::GetTeamProjectCollection($workspaceInfos[0].ServerUri);

#then I can get the version control service

$vc = $tfsCollection.GetService([type] “Microsoft.TeamFoundation.VersionControl.Client.VersionControlServer”);

#and for example, download something

$fileXml = Join-Path -Path $rootBuildPath -ChildPath “file.xml”
$itemToDownload = $vc.GetItem(“$/teamProjectName/file.xml”, [Microsoft.TeamFoundation.VersionControl.Client.VersionSpec]::Latest);
$itemToDownload.DownloadFile($fileXml)


It works for all xaml builds and also for the new build system.

VSCode + Git – Step-by-Step

Hey guys, I’m amazed with VSCode, it’s simple and powerful!

My idea with this post is to make it more simplified, and clear for the ones that are just starting with code.

You must have in your machine VSCode and Git installed!

Also you must have a repository ready to be used, in my case I’m using VSTS:
Git

Now to setup your environment:

  1. Open the command prompt in the folder you want to add your project files
    GitClone
  2. Press enter and then your code will be cloned locally
    GitCloning
  3. Now to open in your VSCode just typing “code .” in the project’s folder
    (This is the folder where are your project files)
    Then you will be able to see the project:
    CodeProject
  4. Now go to Git tab
    GitTab
    Now change some file and save, and then it will appear in the Git tab as a change
    GitChange.png
  5. Now you can add a message and Commit All
    GitCommitAll
    At this point you committed your code to your local repository, then if you and to send it to the remote Git, you must sync your code.
  6. Sync to the origin
    GitSync
    Once you press sync, it will execute a git pull and then a git push, that way it can ensure that you are integrating all changes locally and then sending all integrated code back to the server. Conflicts may appear, depending on the changes done pushed to the server previously, in that case VSCode will show for you the conflict and you may use its tool to fix the conflict.


Unable to copy file "SOME FILE" to "SOME FILE". Access to the path ‘SOME FILE’ is denied.

Usually when you must receive some errors like this when you are building your project within TFS, it’s due the Multi-Proc parameter:

image

When it’s true it may access the same file by two different processes or thread which will result in the ugly exception from the title.