YES! It is possible.
Well, there it is not very straight forward but after you get the correct tools, then it becomes very easy.
TFVC to GIT
In my tests I first converted a project from TFVC to GIT, it was done using the tool git-tfs. The easiest way to install it, it is using Chocolatey, with the command: choco install gittfs
After done the installation you can simply convert any TFVC in GIT, you can read more details in the previous link or simply run the command to fetch all the history for all branches:
git tfs clone https://tfs.codeplex.com:443/tfs/Collection $/project/trunk . --branches=all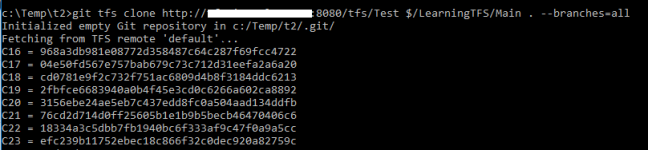
After that you must push the changes to a GIT repository:
git remote add origin https://github.com/user/project.gitFor TFS your repository is found with this URL standard: http://yourserver:8080/tfs/Collection/ProjectName/_git/GitRepository (or https, changing the port to 443)
Now you can push the content:
git push --all origin
Then in the history, you can see this result comparing TFVC and GIT repositories:
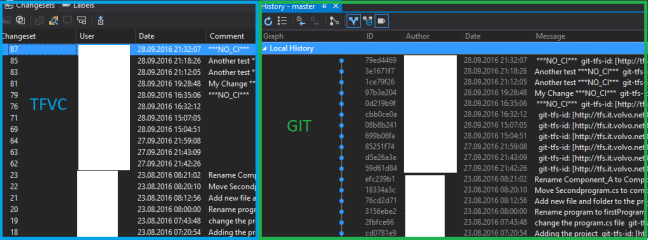
As you can see above all history was kept, even the dates and who did the change. Until here we have a great tool to move our TFVC project to GIT without losing any history.
GIT to TFVC
For this move I am using another tool, git-tf, also it is very simple. Simple execute the code below to configure the git-tf tool:
git tf configure http://yourserver:8080/tfs/Collection “$\TeamProjectName” –force
I’m using the flag “force” to ensure that the configuration is being applied. Then you must check-in your project to the new team project:
git tf checkin –deep –autosquash –keep-author
Look how the history looks for GIT and TFVC now:
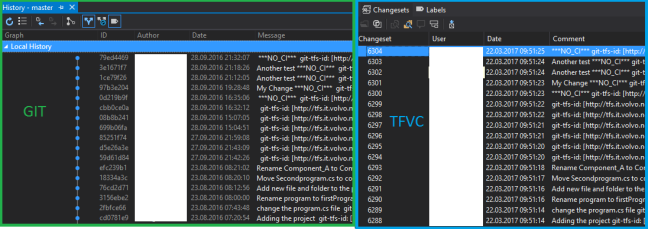
The new TFVC is created with the history, but the dates are not kept unfortunately the tool has such limitation.
Anyway, this approach can help some people to simply move from one to another.


